> ## Documentation Index
> Fetch the complete documentation index at: https://docs.meteroid.com/llms.txt
> Use this file to discover all available pages before exploring further.

# Customer Portal

> Meteroid allows End Users to manage their subscription in full autonomy.

The **Customer Portal** is a self-service interface where your Customers can independently manage their subscriptions, payment methods, invoices, and billing information—without requiring manual intervention from your team.

# What can Customers do in the Portal?

## Payment Method Management

Customers can add and manage their payment methods directly from the Customer Portal. The available payment methods depend on what has been configured in **Settings > Payment Methods** for the invoicing entity. For example, if Stripe is configured to accept credit cards, Customers will be able to enter their credit card information in the Customer Portal.

However, the payment method that will actually be used to process payments is determined by the **payment method strategy set at the Subscription level**. For example, even if a Customer adds a credit card in the Customer Portal, it will not be used if the Subscription is configured to use **bank transfer**.

💡**Note:** When a Customer adds a new payment method of a given type (for example, a new credit card), it automatically becomes the default payment method for that type and will be used for future payments when that payment method is selected at the Subscription level. This is particularly useful when a Customer needs to update an expired or replaced card.

## Update Billing Details

Customers can update directly in the Portal their billing info (email, billing adress, tax number...). They updated information are automatically reflected in Meteroid and applied to future invoices.

<Frame>
  <img src="https://mintcdn.com/meteroid/hS4Na9oCFXpPXCdn/public/meteroid-customer-portal-billing-details.png?fit=max&auto=format&n=hS4Na9oCFXpPXCdn&q=85&s=1e83045e590857b84b5f089e7de9b161" alt="Update billing details from Meteroid's Customer Portal" width="907" height="865" data-path="public/meteroid-customer-portal-billing-details.png" />
</Frame>

## Manage & Pay Invoices

Customers can view and download their past invoices with their payment status. If the invoices have not already been paid, they can pay them using the pre-defined payment method:

* If the subscritpion payment method has been set to "Online (card/direct debit)", Customers will be able to update their card / account informations
* If the subscritpion payment method has been set to "Bank transfer", Customers will access the bank details set in settings > Payment methods

In the Subscription section, clicking "Manage", Customer can access a preview of their upcoming invoices.

<Frame>
  <img src="https://mintcdn.com/meteroid/hS4Na9oCFXpPXCdn/public/meteroid-customer-portal-invoice.png?fit=max&auto=format&n=hS4Na9oCFXpPXCdn&q=85&s=5e058f1eadaf4f5fe66052d7262e3b25" alt="Manage and pay invoices from Meteroid's Customer Portal" width="909" height="741" data-path="public/meteroid-customer-portal-invoice.png" />
</Frame>

## Upgrade/downgrade their subscriptions and buy Add Ons

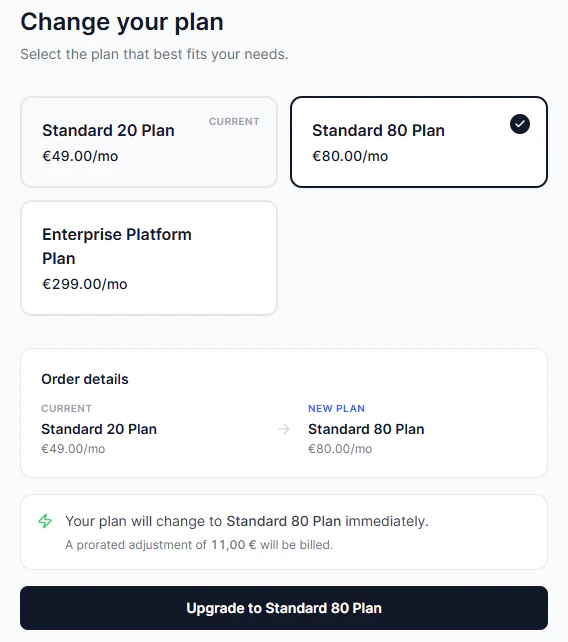
In the subscription section, clicking "Manage" and then "Change Plan", End Users can upgrade/downgrade their subscription in full autonomy.
<Frame>
  <img src="https://mintcdn.com/meteroid/qgsZGbMShM9vCnnz/public/meteroid-customer-portal-upgrade.png?fit=max&auto=format&n=qgsZGbMShM9vCnnz&q=85&s=bebfc7d2bd751d0eb8c89c5c698b3a4d" alt="Upgrade / downgrade from Meteroid's Customer Portal" width="896" height="256" data-path="public/meteroid-customer-portal-upgrade.png" />
</Frame>

💡**Note:** By default billing behaviour:

* downgrades take effect at the end of the current billing period (no credits).
* upgrades take effect immediately. A prorated invoice is immediately issued including credit for the former plan and charge for the new one.

💡**Note:** To have more information on Plans that are displayed in the Customer Portal (and so eligible for upgrade/downgrade), please read the managing plans section.

In the subscription section, clicking "Manage" and then "Add-ons", End Users can buy Add-ons in full autonomy.

💡**Note:** To have more information on Add-Ons that are displayed in the Customer Portal (and so that can be bought by End Users), please read the managing add-ons section.

# Portal Customization

You can customize the look and feel of your Customer Portal to match your brand identity and provide a consistent experience for End Users. Branding is configured **per invoicing entity** from the **Settings > Merchant** section, and applies to the hosted portal, the embedded components, and the checkout page:

* **Logo** — appears in the portal header, on the checkout page, and on invoices.
* **Brand / accent color** — the primary color used for buttons, links, and highlights.
* **Theme mode** — `Light` or `Dark`.
* **Corner roundness** — `Sharp`, `Modern`, or `Rounded`.

A live preview shows how your settings look before you save. If you run multiple invoicing entities, any value left unset on a secondary entity is inherited from your **default** invoicing entity.

<Frame>
  <img src="https://mintcdn.com/meteroid/Zr8JcsGzMqEbpv6z/public/meteroid-portal-custom.png?fit=max&auto=format&n=Zr8JcsGzMqEbpv6z&q=85&s=f5b7d8651fdb7451a14ae82270fba2f3" alt="Customizing Meteroid's Customer Portal branding" width="931" height="571" data-path="public/meteroid-portal-custom.png" />
</Frame>

# Integrating the Customer Portal

You can bring the Customer Portal into your own product in two ways:

* **Hosted portal** — redirect Customers to a full-page portal hosted by Meteroid.
* **Embedded components** — embed the whole portal, or individual widgets (invoices, current plan, payment methods, usage…), directly inside your application.

Both are authenticated with a short-lived **Customer Portal token** that scopes access to a single Customer.

## Generating a portal token

Generate a token for a Customer from your backend using your **tenant API key**. Never expose your API key in the browser — mint the token server-side, then hand it to your frontend.

<CodeGroup>
  ```bash cURL theme={null}
  curl -X POST https://app.meteroid.com/api/v1/customers/{customer_id_or_alias}/portal-token \
    -H "Authorization: Bearer $METEROID_API_KEY" \
    -H "Content-Type: application/json" \
    -d '{ "expires_in_seconds": 86400 }'
  ```
</CodeGroup>

The response returns the token and your portal base URL:

```json theme={null}
{
  "token": "eyJhbGciOiJIUzI1Ni...",
  "portal_url": "https://app.meteroid.com"
}
```

<ParamField body="expires_in_seconds" type="integer" default="86400">
  Token lifetime in seconds. Optional — defaults to **24 hours**. Must be
  between `60` (1 minute) and `2592000` (30 days).
</ParamField>

💡 **Note:** The `customer_id_or_alias` path segment accepts either the Meteroid Customer ID or the Alias (External ID) you assigned. See the [API reference](https://docs.meteroid.com/api-reference/customers/generate-a-portal-token-for-a-customer) for the full schema.

## Hosted portal (redirect)

The simplest integration: build a portal URL with the token and send the Customer to it (a link, a redirect, or a new tab).

```
https://app.meteroid.com/portal/customer?token=<CUSTOMER_PORTAL_TOKEN>
```

The hosted portal is already branded with your **Settings > Merchant** configuration. You can still override the appearance per link with the [query parameters](#appearance-and-behavior-parameters) below (for example `&theme=light`).

## Embedded UI components

Instead of sending Customers away, embed the portal — or a single widget — inside your own app. Embedding is driven by one query parameter, **`?embed=`**, which selects what to render:

```
https://app.meteroid.com/portal/customer?token=<CUSTOMER_PORTAL_TOKEN>&embed=invoices
```

### Available embed views

| `embed=` value    | What it renders                                                        |
| ----------------- | ---------------------------------------------------------------------- |
| `portal`          | The complete self-service portal (all sections)                        |
| `plan`            | Compact card for the current plan — name, status, price, next charge   |
| `subscriptions`   | List of the Customer's active subscriptions                            |
| `subscription`    | A single subscription — **requires** `&subscription=<subscription_id>` |
| `usage`           | Metered usage for the current billing period                           |
| `invoices`        | Recent invoices with pay & download actions                            |
| `payment-methods` | Saved payment methods, with add-card and set-default                   |

If `embed` is omitted (or set to an unknown value), the full portal is rendered.

### Appearance and behavior parameters

Every embed view accepts the following optional parameters. Precedence is **URL parameter → your portal branding (Settings > Merchant) → Meteroid default**, so a parameter always wins when present.

| Parameter      | Values                       | Default          | Description                                              |
| -------------- | ---------------------------- | ---------------- | -------------------------------------------------------- |
| `token`        | JWT string                   | —                | **Required.** The Customer Portal token.                 |
| `embed`        | one of the views above       | full portal      | Which widget to render.                                  |
| `theme`        | `light`, `dark`              | `dark`           | Color mode.                                              |
| `accent`       | hex color (`#RRGGBB`)        | your brand color | Accent / primary color.                                  |
| `radius`       | `Sharp`, `Modern`, `Rounded` | `Modern`         | Corner roundness.                                        |
| `bg`           | hex color                    | derived          | Page background override.                                |
| `surface`      | hex color                    | derived          | Card / panel surface override.                           |
| `text`         | hex color                    | derived          | Primary text color override.                             |
| `border`       | hex color                    | derived          | Border & divider color override.                         |
| `branding`     | `false`                      | shown            | Set to `false` to hide the "Powered by Meteroid" footer. |
| `count`        | `1`–`20`                     | `5`              | Number of rows in the `invoices` widget.                 |
| `subscription` | subscription id              | —                | Target subscription for the `subscription` view.         |

<Info>
  Color parameters accept hex only (`#RGB` or `#RRGGBB`). Values that don't
  parse are ignored and fall back to your branding, then the default.
</Info>

### Adding the embed to your app

<Tabs>
  <Tab title="Embed script (no build step)">
    Drop the Meteroid embed script into your page and describe the widget with `data-*` attributes. The script auto-mounts every matching element and keeps the frame sized to its content.

    ```html theme={null}
    <div
      data-meteroid-portal
      data-token="CUSTOMER_PORTAL_TOKEN"
      data-view="invoices"
      data-theme="dark"
      data-accent="#C6F94E"
      data-count="10"
    ></div>

    <script src="https://app.meteroid.com/embed.js" async></script>
    ```

    Prefer to mount it yourself? The script also exposes a global:

    ```html theme={null}
    <script src="https://app.meteroid.com/embed.js"></script>
    <script>
      Meteroid.mountBillingPortal("#billing", {
        token: "CUSTOMER_PORTAL_TOKEN",
        view: "portal",
        theme: "dark",
      });
    </script>
    ```
  </Tab>

  <Tab title="React (SOON)">
    For bundled apps, the `@md/portal-embed` package ships a React component that renders the iframe and handles auto-resize for you:

    ```jsx theme={null}
    import { BillingPortal } from "@md/portal-embed/react";

    export function Billing({ token }) {
      return (
        <BillingPortal
          token={token}
          view="invoices"
          theme="dark"
          accent="#C6F94E"
          count={10}
          onNavigate={(target) => router.push(`/billing/${target}`)}
        />
      );
    }
    ```

    The same package exposes framework-agnostic `mountBillingPortal(target, options)` and `buildEmbedUrl(options)` helpers.
  </Tab>

  <Tab title="Plain iframe">
    You can embed with a raw iframe and no dependencies. Point it at the embed URL and listen for the resize message so the frame grows to fit its content (embedded widgets never show their own scrollbar):

    ```html theme={null}
    <iframe
      id="meteroid-billing"
      src="https://app.meteroid.com/portal/customer?token=CUSTOMER_PORTAL_TOKEN&embed=invoices&theme=dark"
      style="width: 100%; border: 0"
      allow="payment"
    ></iframe>

    <script>
      const frame = document.getElementById("meteroid-billing");
      window.addEventListener("message", (e) => {
        if (e.source !== frame.contentWindow) return;
        if (e.data?.type === "meteroid:resize") {
          frame.style.height = e.data.height + "px";
        }
      });
    </script>
    ```
  </Tab>
</Tabs>

<Info>**Auto-resize.** The embedded portal reports its height to the parent window via a `postMessage` of `{ type: 'meteroid:resize', height }`. The embed script and React component handle this automatically; with a plain iframe, add the listener shown above. When you pass an `onNavigate` handler, in-widget links post `{ type: 'meteroid:navigate', target }` instead of opening a new tab, so navigation stays inside your app.</Info>

💡 **Note:** Embedded widgets render on a transparent background so they blend into your page, and can be embedded on any origin — access is controlled entirely by the Customer Portal token, not by domain.
