Introduction
At the heart of the system are Plans, which define what customers access and how they are billed—typically on a monthly or annual basis. Meteroid supports a wide range of pricing models, from subscription and slot-based pricing to usage-based and capacity commitment models, as well as one-time and recurring charges. You can easily configure and adjust these models directly within the platform.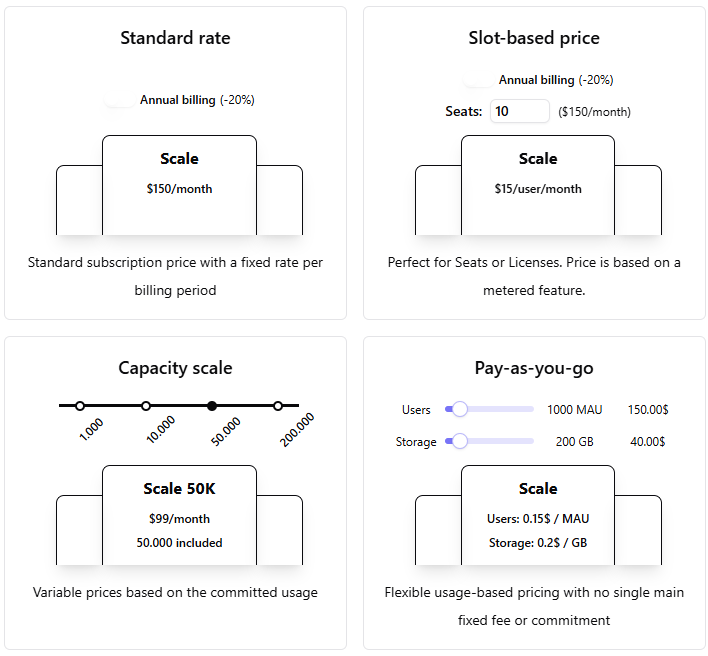
Plans
In Meteroid, Plans represent the functionalities of a product or service that Customers are billed for during a pre-defined time period (e.g monthly or annually). For a given product/sercice, you can for example implement “beginner”, “intermediate” and “advanced” plans, providing your Customers with different options of product or service access. Plans work as templates for subscriptions (cf. Billing > Subscriptions): by selecting the plan in the subscription assignment flow, the subscription configuration will be pre-filled. Nevertheless, when assigning a subscription, all information inherited from the plan can also be customized without affecting the original plan. Meteroid allows your teams to manage plans, their content, price and trial configuration without requiring additional engineering changes.Creating a Plan in Meteroid
To create a Plan in Meteroid, click Product catalog > Plans > New plan Then, follow these steps by filling in the required fields:- Name: Assign a name to your Plan. This name will be displayed to the End User on their portal.
- Currency: Select the Plan currency.
- Plan Type: Choose the type of plan from the following options:
- Standard: Designed for Self-serve or subscriptions that customers can purchase independently. These plans are displayed in the Customer Portal and end users have the possibility to upgrade / downgrade among standard plans.
- Free / Freemium: Free plans allow your customers to access limited functionalities of your product, with the option to charge for supplemental or advanced features later through separate upgrades.
- Payment Information: These plans cannot include paid components, ensuring that access remains fully free and customers will not be required to provide payment details when subscribing to these plans.
- Custom: Ideal for Sales-led opportunities where tailored solutions are needed. Custom plans allow you to adapt for specific Customers or groups, offering bespoke configurations based on their unique requirements.
Configuring a Plan in Meteroid
The first layer provides general information about your plan, including its status, currency, and more. To make updates, click the pen icon in the upper right corner, where you can modify the following details:- Plan Name: Update the title of the plan that will be displayed to End Users on their Portal.
- Plan Description: Provide or edit a brief description (for internal use only).
- Net Terms (in days): Define the payment period granted to your clients. After this period, invoices will be marked as overdue.
- Self-service rank: Impact the display order of standard plan on the Customer Portal.